Full List of App Settings (Control Deck)
The settings view opened with Ctrl+Shift+O is divided into 11 categories. The main items of each category are listed below.
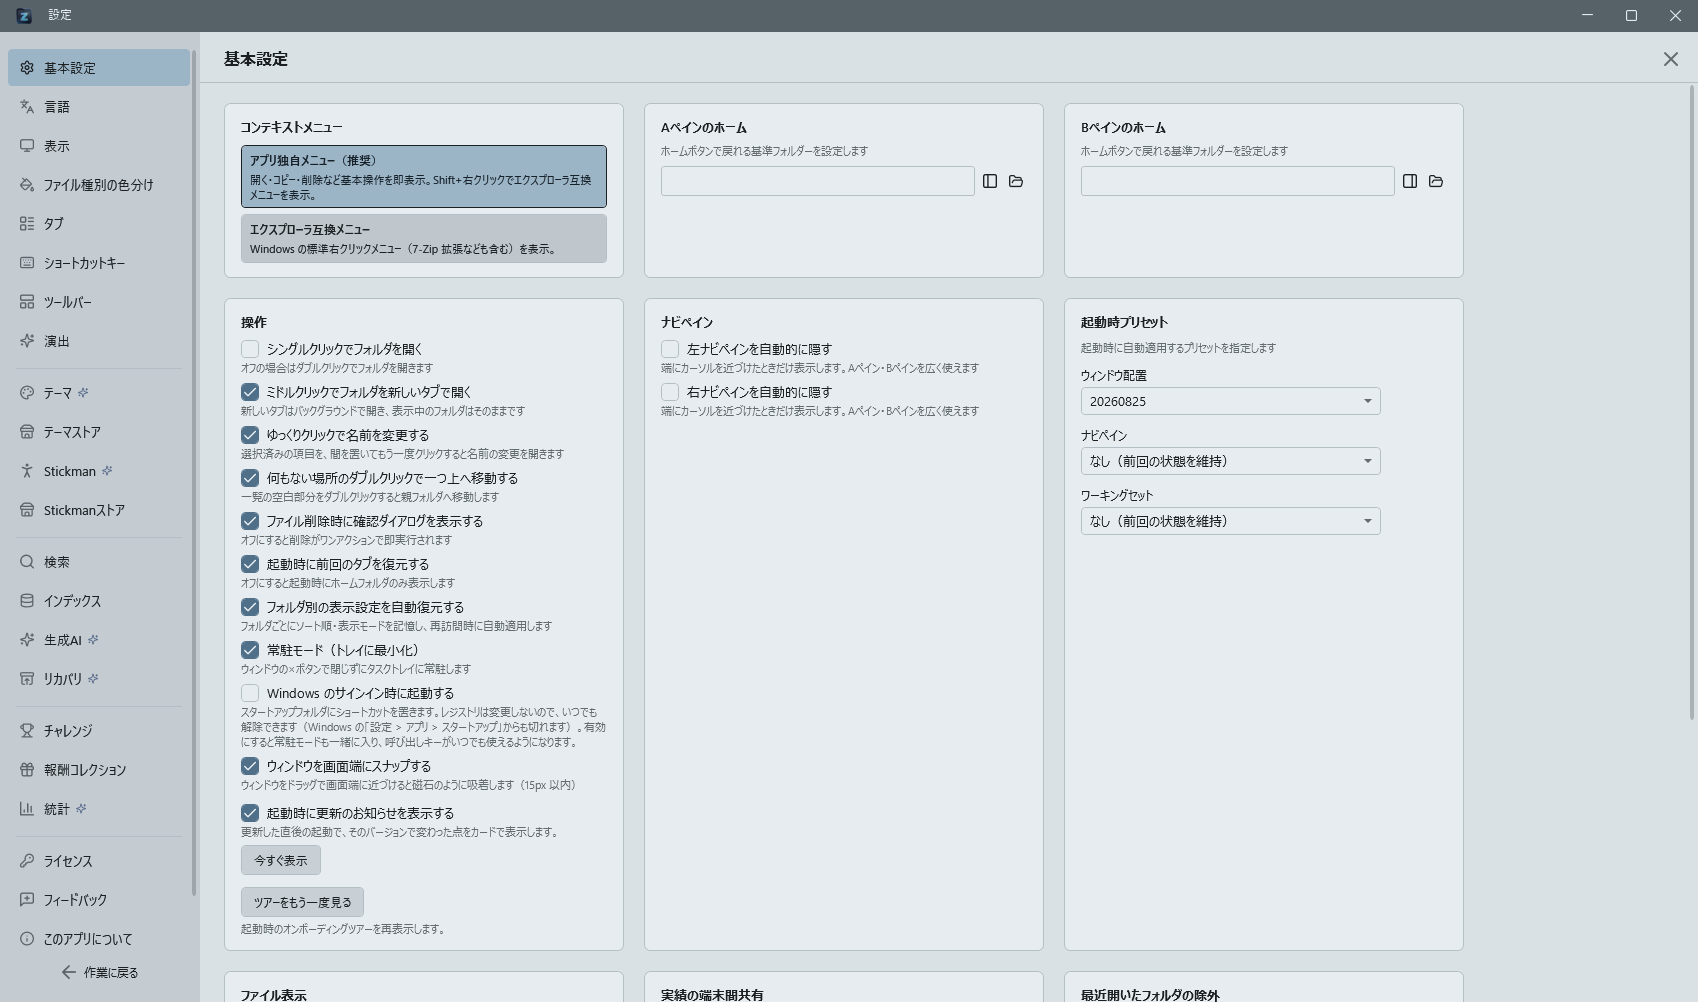
General
Context Menu
Selects which menu is shown when right-clicking in the file list.
- App Custom Menu (recommended): Instantly shows basic operations like Open, Copy, Delete, Rename, Favorites, Index Search. Use Shift+right-click for a temporary switch to the Explorer-compatible menu.
- Explorer Compatible Menu: Shows the Windows standard right-click menu (including shell extensions such as 7-Zip).
Home Folder
Sets home addresses for Pane A and Pane B independently.
- Set to displayed folder: Set the folder currently shown in A/B pane as home.
- Select folder: Choose a folder via dialog.
Operations
- Open folders with single click: On for single click, off for double-click navigation.
- Show confirmation dialog when deleting files: Off bypasses the shell confirmation and moves to Recycle Bin.
- Restore previous tabs on startup: Off starts with only the home folder.
Navigation pane (edge-hover auto-reveal)
- Auto-hide left nav pane: When on, the left nav pane is normally kept closed; bringing the cursor into the thin 12px strip along the window's left edge slides it in as an overlay after about 0.15 s. The band out to 32px opens it too, if you stay there for a second — a safety net for when you miss the very edge, so merely passing through does not open it. It slides out about 0.4 s after the cursor leaves. Useful when you want to give the A and B panes the maximum amount of room.
- Auto-hide right nav pane: The same toggle for the right pane. The left and right sides can be enabled independently.
- Pin: While the pane is auto-revealed, a pin button appears in the top-right of its header. Clicking it keeps the pane open even after the cursor leaves; clicking again releases the pin and the pane resumes auto-hiding. Pin state is reset when the app restarts.
- Opening with the toggle key or the Ring Launcher: Even on an auto-hidden side, "Toggle Left Pane" / "Toggle Right Pane" (default
Ctrl+Shift+[/Ctrl+Shift+], or ◀ ▶ on the Ring Launcher) shows the pane temporarily. Repeat the same action or click outside the nav pane to close it. Closing it with the toggle also releases a pin. The auto-hide setting itself stays as it is. - Drag-and-drop / context-menu protection: While dragging an item over the nav pane, or while a context menu launched from it is open, the auto-hide timer is suppressed so the pane does not disappear mid-interaction.
- Both toggles default to OFF — the behaviour of v0.48.3 and earlier (always visible / manual toggle) is unchanged unless you opt in.
Display
- Show path in title bar: Shows the focused pane's full path in the title bar.
- Show file extensions: Off hides file extensions.
- Show hidden files and folders: Toggles visibility of Windows hidden-attribute files.
- Alternate row colors: When on, every other row in the file list is tinted a very subtle color, making rows easier to track in wide listings (off by default). The color isn't fixed — it's computed automatically against the current theme's background, so it looks natural on any theme.
- Sort Downloads folder by date modified: On applies newest-first sort when navigating to Downloads (reverting to the original sort elsewhere).
Resident Mode
When enabled, pressing the X button minimizes to the system tray instead of exiting. See Resident Mode for the operation table.
Start when I sign in to Windows
Launches Zenith Filer when you sign in to Windows. Off by default.
It works by placing a shortcut in your Startup folder and writes nothing to the registry. You can turn it off from this checkbox, or from Settings > Apps > Startup in Windows.
Turning it on also enables Resident Mode, because without it closing the window ends the process and the global hotkey (When the app hotkey does not work) stops working. Zenith starts minimized, so it will not come to the front every time you sign in.
Snap window to screen edges
When enabled, dragging the window to within 15 px of a screen edge (the work area, excluding the taskbar) makes it snap into place like a magnet. All four sides and corners are supported, and snapping is evaluated against the monitor the window is on, so it behaves naturally in multi-monitor and high-DPI setups. Keep dragging to pull the window back off. Resizing does not snap, and it coexists with the standard Windows Aero Snap (Win + arrow, etc.). On by default.
Notification display duration
Choose from Short (1.5s), Standard (3s), or Long (5s).
Text editor
Specify the executable used by the "Open in text editor" context menu. Bypasses the OS .txt association and launches your editor of choice (VS Code / Notepad++ / Sakura / Notepad, etc.) directly.
- Executable path: Type the editor's
.exepath or pick it via the[Browse…]button. Leave blank to fall back to the OS default app. [Auto-detect]: Searches in this order — VS Code onPATH→%LOCALAPPDATA%\Programs\Microsoft VS Code\Code.exe→ Notepad++ → Sakura → Windows Notepad — and fills in the first match.- If the configured path no longer exists, the app safely falls back to the OS default editor.
- Additional extensions: Add extensions that show "Open in text editor", separated by commas (e.g.
csv, dat). A leading.or*.is optional. The extensions included by default (.txt,.md,.jsonand so on) stay as they are, and their list is shown below the field. Added extensions also become targets of "Compare Text", which puts two files side by side.
Search (Search UI)
Search behavior (select from 3 patterns for where results are displayed)
- Same pane, new tab: Enter opens results in a new tab in the same pane (default).
- Same pane, instant search in current tab: Enter shows results in the current tab; clearing returns to the list.
- Opposite pane, new tab: Enter opens results in a new tab in the opposite pane. In single-pane, automatically switches to dual-pane.
Path click behavior in search results (select from 3 patterns for clicking the path column)
- Show in same tab: Switches from search results back to the normal list.
- Same pane, new tab: Opens a new tab in the same pane.
- Opposite pane, new tab: Opens a new tab in the opposite pane (auto-switches to dual-pane if needed).
Search display settings
- Automatically switch to single-pane mode when searching: On expands results into single-pane. Searching from Pane B moves the search tab to Pane A.
Index (Indexing & Freshness)
Index update timing and load
- Automatically incorporate changes:
FileSystemWatcherdetects changes and performs immediate incremental updates. - Update at regular intervals: Rescans all registered folders at 1h / 2h / 4h / 1 day intervals.
- Update only when needed: Updates only when you press "Create Unindexed" or "Full Rebuild…" in the Index view. No automatic indexing at startup.
Performance and load
- Update index in power-saving mode: Throttles CPU and disk use to reduce impact on other apps (via
CpuIdleService, see Idle Execution (CPU load avoidance)). - Process network drives gently: Processes UNC and mapped drives slower than local, reducing bandwidth and server load.
- Full re-index minimum interval: 6h / 12h / 24h. Manual full rebuilds inside the interval are converted to incremental updates.
Search result freshness
- Keep as up-to-date as possible (freshness priority): Starts background incremental updates and unindexed-creation for all target folders in parallel with search.
- Show message when index may be stale: Displays a warning above search results when unindexed folders exist. Dismissible with the X on the right.
Display
Default view for new tabs
- Show folders first (on/off).
- Default sort order: Name / Date Modified / Size / Extension × Ascending / Descending. Applied to new tabs opened via
Ctrl+Tor path input; not applied to search result tabs or existing tabs.
File list row height
Ultra Compact (20px) / Compact (24px) / Standard (32px) / Relaxed (40px). Reflected immediately in both A/B panes and persists across restarts.
Copy progress window
Starting a copy or a move opens a progress window. Operations are listed as rows in a single window, each showing speed, time remaining, file count, size and the file being processed. Every row can be paused, resumed or stopped, and the footer has Stop all and Clear finished. Closing the window does not stop the transfer — the bar at the bottom left of the main window takes over. Progress also appears on the taskbar icon, so you can follow it from another application. The window closes itself shortly after everything succeeds, and stays open when something was stopped or failed, so you can read what happened.
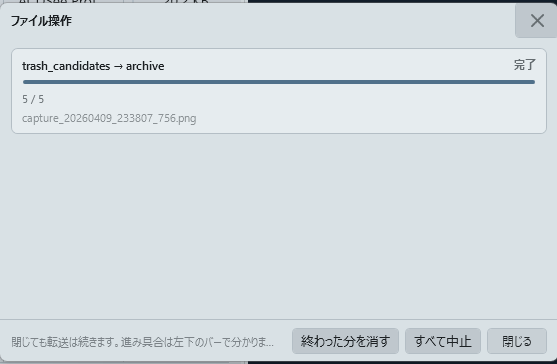
You can choose when it appears: Always (default), only for large transfers (50 files or 50 MB), or never (bar at the bottom left only).
Text and icon sizes
The list text, the list icons and the tab text can each be sized independently. All three default to Auto (follow row height), which looks exactly as before. Pick a size yourself and it stays put even when you change the row height. The tab text setting applies both to the A/B pane tabs and to the tab list in the navigation pane. Sizes are kept within readable bounds: 8–32 for text and 8–48 for icons.
Outline on the selected row
Marks the selected row with an accent-coloured outline in addition to the background fill (on by default). It exists to keep the row under the pointer apart from the row you picked with the keyboard: even in themes where the two fills are close in strength, you can still see where the selection is. Turn it off to go back to fill only.
File Type Colors
Colors file names in the file list by file type, based on extension (off by default). This dedicated settings page lets you configure:
- Enable: Turning on the master toggle colors file names in the list according to the rules below.
- Recommended rules (7 categories): A ready-made set of extension/color pairings is included for images, videos, audio, archives, executables, documents, and code.
- Free editing: Every rule's target extensions, color (
#RRGGBB), and enabled state can be edited. Use "Add rule" to create a new rule; rules you add can also be removed (the 7 built-in rules can only be disabled, not deleted). - Reset to defaults: A single button restores the recommended rule set.
- Just like alternate row colors, the actual displayed color is automatically adjusted against the current theme's background, so it never becomes hard to read on any theme.
Effects
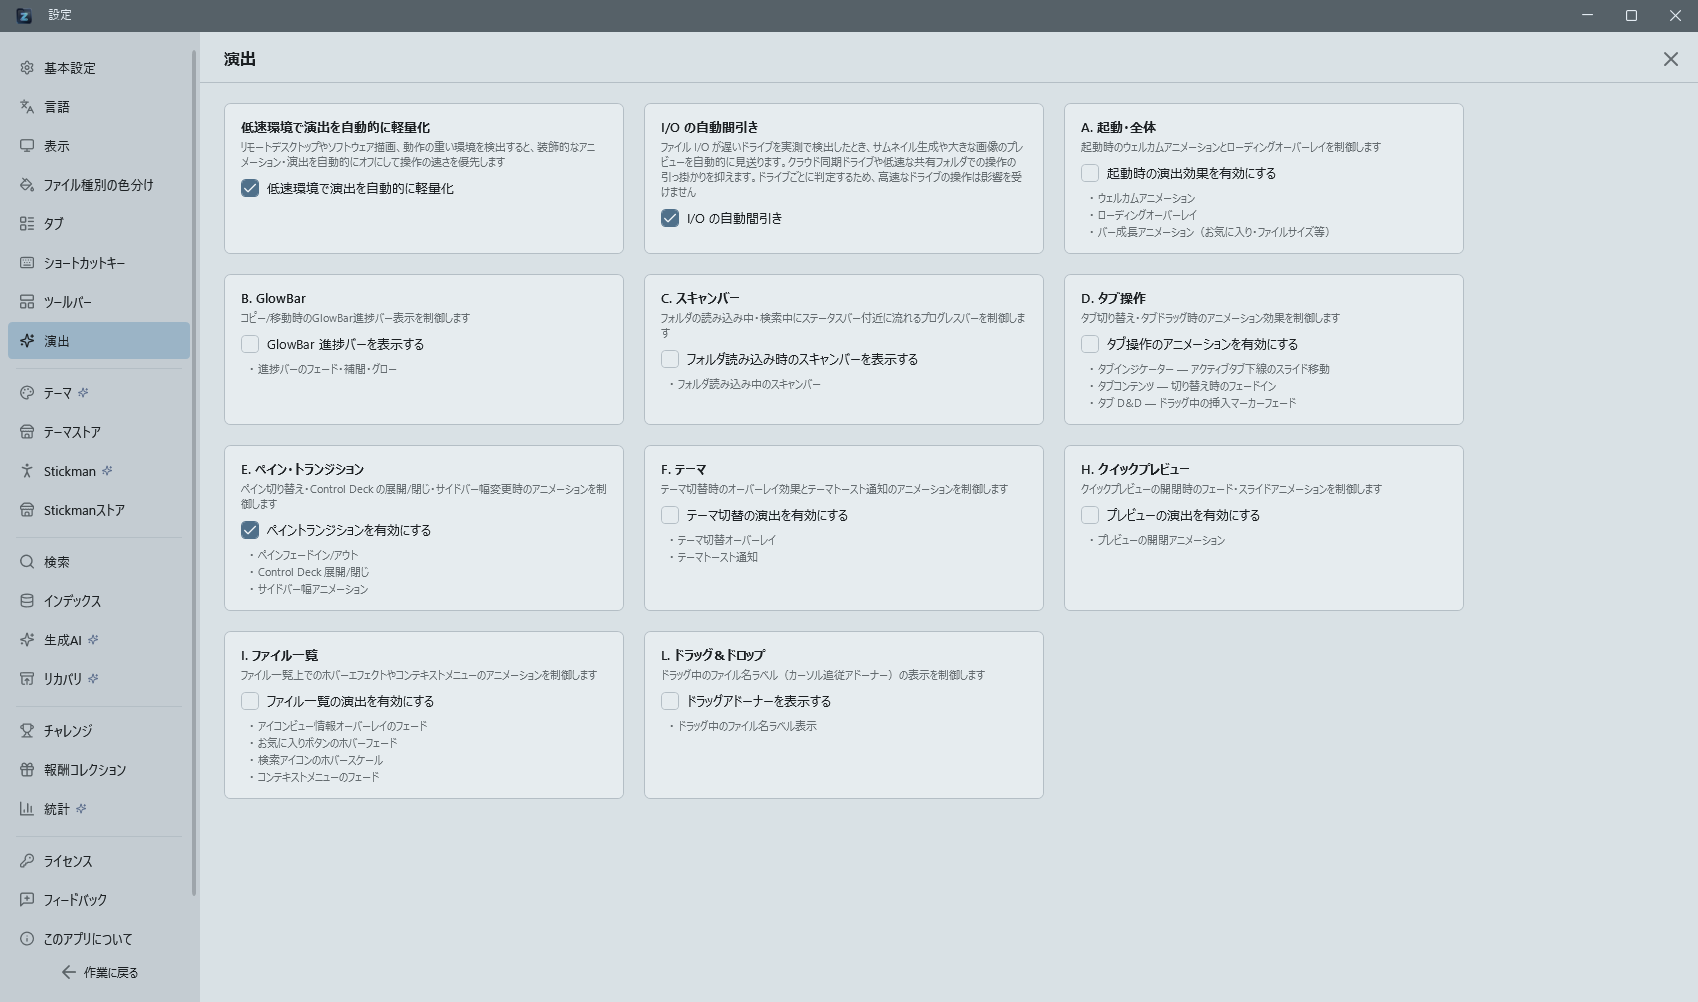
Classifies in-app effects into 12 categories toggled individually. See Effects Categories — Detailed 12-category table for the full table with target UI.
Automatically reduce effects on slow systems (on by default): Automatically detects remote desktop sessions, software rendering, and environments where screen transitions are actually slow, and turns off the decorative effects (Tab Operations, Pane Transitions, Theme, Preview, File List, Drag & Drop) all at once to prioritize responsiveness. A toast notification is shown when the reduction kicks in. Progress indicators (GlowBar, Scan Bar) and startup effects are not affected. Even after automatic reduction, turning this setting off restores effects according to each category's setting as before.
Video thumbnails (optional download): Thumbnails for formats Windows supports — mp4, mov, mkv and so on — work with nothing to install. Install this only if you also want thumbnails for formats Windows cannot produce one for, such as flv. It downloads about 130 MB into data
fmpeg\. Once installed, it is used only for formats Windows could not handle (supported formats keep going through Windows, so speed is unchanged). It is not bundled with the app so that people who do not need it are not made to carry the size. The download is an LGPL build, used unmodified and invoked as a separate program, so it does not affect this app's licence. Use "Remove" to delete it when it is no longer needed (an FFmpeg you put on your PATH yourself is left alone).
Automatic I/O thinning (on by default): Automatically detects drives with slow file I/O from measurements taken during normal use, and skips thumbnail generation, previews of large images (over 2MB), and the speculative pre-listing done before folder tree icons are fetched (the Box Drive warm-up). This covers cloud-synced drives such as Box and OneDrive, slow network shares, and local drives slowed down by monitoring software. The decision is held per drive, so with a cloud-synced folder in pane A and a local drive in pane B, operations on the fast side are entirely unaffected. It reverts on its own once the drive stops being slow. No new disk queries are added in order to make the decision, so the feature itself can never become a source of delay. The decision uses time per unit of data as well as elapsed time, so "this image was simply large" is never mistaken for a slow drive. Image thumbnails on cloud-synced drives (Box) used to be suppressed outright based on the shape of the path; they are now held back only when the drive measures slow (files that have not finished syncing remain excluded, as before). Images of 2MB or less are still shown as usual even on a slow drive, so the preview feature is never lost. Folder tree icons are still fetched as before as well (only the pre-listing that precedes the fetch is skipped). This is a separate setting from "Automatically reduce effects on slow systems" above (that one looks at rendering speed, this one at file I/O speed).
Automatic migration from legacy settings (MicroAnimations, ListAnimations, WelcomeAnimation) is supported.
Shortcut Keys
- Customize the keyboard shortcut for any action.
- Click an action's input field and press a key to rebind; individual reset available.
- Export / Import buttons migrate settings via JSON (structure and operations covered in How Keybindings Work).
Finding a key
There are over 50 bindable actions across five groups. The bar at the top of the page stays in place while you scroll, and that is where you search from.
- Filter — works from the name or from the key.
- "copy" → finds
Ctrl+C Ctrl+D→ shows what that key is currently used for (the direction you need when hunting for a free key)- The
+is optional (ctrlcstill findsCtrl+C) - Separate words with a space to narrow to entries containing all of them (full-width spaces work too)
- Descriptions and group names are searched as well
- Count — while filtering, "3 of 52" is shown, so when nothing matches you can tell "there is none" apart from "the filter is wrong".
- Jump to a group — press a group name in the bar to scroll to that heading. While filtering, only the surviving groups are listed.
Key map presets
Apply another file manager's key layout in one go, from the buttons at the top of the page.
- Zenith standard — returns every assignment to its default
- Total Commander style —
F5copy,F6move,F7new folder,F8delete,Shift+F6rename,F3quick preview,Ctrl+Rrefresh,Ctrl+Dfavorites,Alt+F7search - Zenith 2 (two-key) —
Ctrl+Kfollowed by one key opens a view;Ctrl+Bfollowed by one key drives the panes. You only memorise the two entry keys, and holding the first one for a moment lists the keys you can press next. See Zenith 2 two-key shortcuts - AFXW style —
Ccopy,Mmove,Ddelete,Knew folder,Rrename. A single-key layout that uses no modifiers. Assignments of this shape act only while you are in the file list — anywhere you type text, such as the path box, the search box or an inline rename, they go in as characters. Inside the list an assignment takes precedence over type-ahead, soCcopies rather than jumping to names beginning with C -
Explorer style —
Backspacegoes back,Alt+Upgoes to the parent. It looks like a small change, but it closes the divergence people trip over first:Backspacemeans "up" in Zenith and "back" in Windows Explorer. -
The breakdown is always shown before you press. How many assignments will change, and how many of those replace assignments you changed yourself. If a key would end up shared by two actions after applying, those combinations are listed too.
-
Anything the preset does not mention is left alone. Other file managers have no keys corresponding to Zenith's own features (AI, macros, themes). Those keep their current assignment, and your own individual customizations survive there as well.
-
"Zenith standard" puts everything back at any time, so trying a preset costs nothing.
-
You can add your own presets. Like themes and language files, presets are JSON read from
data\keymaps\in the execution folder. Drop in one file of the same shape and a new button appears in settings.
{
  "id": "my_layout",
  "nameKey": "keymap.preset.total_commander",
  "descriptionKey": "keymap.preset.total_commander_desc",
  "bindings": [
    { "actionId": "FileList.Delete", "key": "F8", "modifiers": "" },
    { "actionId": "FileList.AddToFavorites", "key": "", "modifiers": "" }
  ]
}
An empty key means unassigned — use it to free a default key so another action can take it. modifiers joins Control / Alt / Shift with +.
Macro keys
Macros you have registered appear here too, under the Macros group. You assign keys to them exactly as you would to any other action, and you are warned if the key is already taken. If you assign one to the first stroke of a two-key shortcut such as Ctrl+K, Zenith tells you it will never fire. Two-key shortcuts (Ctrl+K then M, for example) can be assigned as well.
Note that a bare single character with no modifier (just M, say) cannot be assigned to a macro, because that character would stop working when you type a file name or filter a list.
Moving between panes with the arrow keys
Whether Left and Right move between pane A and pane B can be changed from this screen. If you would rather use the arrow keys to walk the folder hierarchy, clear the assignment or move it to another key.
Note that in icon view (small, medium and large icons) Left and Right never move between panes while you are in the file list. Icons are laid out across as well as down, so moving the selection sideways takes priority. Use Tab or F6 to move between panes. If you have assigned pane movement to a key other than Left / Right, that key still works in icon view.
When the app hotkey does not work
The hotkey that summons the app from outside (Ctrl+Shift+E by default) is a system-wide hotkey, and Windows grants it to one application only. If another resident program is already using the same combination, Zenith Filer cannot register it.
When that happens, a warning appears on this screen, and if you have just changed the key you also get a notification. Choose a different key, or check the settings of the program that claimed it first.
Two-pane staples
- Copy to other pane / Move to other pane — sends the selection to the folder open in the other pane. It runs through exactly the same processing as drag and drop, so the name-collision prompt, the progress display and
Ctrl+Zall work as usual. Nothing is sent while a single pane is shown — with the destination off screen there would be no way to tell where the files went, so it stops and says why in the status bar. - Open in text editor — opens the selected files in a text editor.
- None of the three is bound to a key by default.
F5currently means Refresh, and taking it would betray the fingers of anyone coming from Explorer. Apply the Total Commander preset, or assign keys of your choosing on this page.
Toolbar [Pro]
Customize the quick-access toolbar in the pane header (Back / Forward / Refresh, view-mode switches, etc.) freely.
- Reorder: Drag buttons to change their order.
- Show / hide: Toggle visibility per button (at least one button always remains).
- Separators: Add or remove divider lines to group buttons.
- Changes apply instantly across the whole app (both Pane A and Pane B) and persist across restarts. A Restore default layout button returns to the initial state.
- This is a Pro feature. In the free version the layout is fixed to the default, and the customization screen is shown locked with guidance.
Ring Launcher
Decides what goes on the ring that the left+right mouse buttons — or Ctrl+Shift+Space — bring up around the cursor (see 2-13). The page is split into Basic, Assignment, and Design.
Basic
- Explains how to summon the ring and shows the current trigger key. "Open shortcut settings" takes you to the Shortcut Keys page with that row already filtered.
- Mode: choose 8 slots (single layer) or Multi-level. Single layer uses one ring only and is the least to remember. Multi-level unlocks sub-rings on the Assignment tab.
- While even one sub-ring is attached, single layer is held back (otherwise it would still open outward after you switched it off). The reason is shown along with [Detach all sub-rings].
- Restore everything to default returns to the initial arrangement (eight entries, no sub-rings). Sub-rings are deleted — use the button on the Assignment tab if you only want the slots back. The design is untouched.
Assignment
- Assign any feature to each of the eight slots. "Change" opens the same search window as the command palette, so every feature in the app — and any macro you have saved — can be found by name.
- The preview on the left is a live copy of the ring. Move over a row and the matching sector lights up, so you can see where that feature will sit.
- Each row starts with its direction (up, upper right, right …) and its number. The number is the digit key you press while the ring is open.
- × empties that slot. An empty slot stays as a faint "+" and cannot be picked on the ring — the number of slots never changes, because each direction carries meaning.
- Sub-ring (shown only in multi-level mode): creates a second ring beyond that slot. Whatever was in the slot moves to the child's first position. Creating one takes you straight into editing it, with a trail such as Root › Sub-ring 1 above; click any step to go back.
- Ring name: appears only while you are editing a sub-ring. Clear it to return to the default name.
- Open: descends from a slot that leads to a sub-ring into editing its contents.
- ↺ (on each row): restores just that slot to its default. The button is disabled on a slot that is already at its default — it is greyed out rather than hidden, so the columns never shift under your finger. It does not appear while you are editing a sub-ring.
- Restore default assignment: restores the eight slots alone to the starting layout. The design and the mode are untouched, and no sub-ring is deleted — a detached ring stays under "Unused rings". A sub-ring has no default layout, so the button only works while you are editing the root.
- Saved definitions (at the very bottom of the page): keep the current assignment under a name. [Save the current assignment] stores it and [Apply] brings it back. Sub-rings are kept too, names and all, so what you built comes back exactly as it was. [Overwrite] re-captures the current state; the pencil renames and the bin deletes (deleting always asks first).
- The top two come with the app and are impossible to delete or rename. However far you wander, they are always one click away
- 🔒 Preset (single layer, 8 slots): the factory eight
- 🔒 Preset (two layers, 64 items): the two-ring layout, already built. Applying it switches the mode to multi-layer and turns the eight root slots into Screen / Tabs / Nav views / Find / File actions / Panes / Go / Tools, each holding eight more — 64 in all, with not a single slot left empty. The directions carry over from the single-layer preset (inside "Screen", upper-left is one pane, up is two side by side, left is the left nav…), so what your hand already knows still applies. Swap whatever you disagree with and keep it under your own name with [Save the current assignment], and you can move between the two freely
- You are only asked before applying when the current assignment is not saved in any definition; if it is saved, you can move back and forth freely
- Up to 20 of your own. The design is not included — that lives on its own tab
- The section sits at the very bottom so that growing the list never pushes the assignment settings down
- Unused rings: rings that no slot points to. Emptying a slot with
×does not delete the ring itself — it lands here, so reattaching it or removing it stays your call. - Rearranging and sub-rings are the Pro features. In the free version, summoning the ring and its eight starting entries still work.
Design (available to everyone)
Choose the ring's shape and motion from five presets. The colours come straight from your theme, so it never clashes when you switch themes.
| Design | Character |
|---|---|
| Standard | Blooms out from the centre; whatever you point at lifts gently |
| Swift | Appears by the shortest path with no bounce — smooth over remote desktop or on slower machines |
| Bloom | Opens wide and answers clearly to whatever you point at |
| Slate | Nothing moves; only the colour changes, quietly. A flat look with the gaps closed up |
| Pulse | Lights the selected slot in a strong colour |
- Picking one plays it in the preview right away. Play replays it whenever you like.
- When list effects are off under Settings → "Visual Effects", every design appears instantly; the page says so.
AI
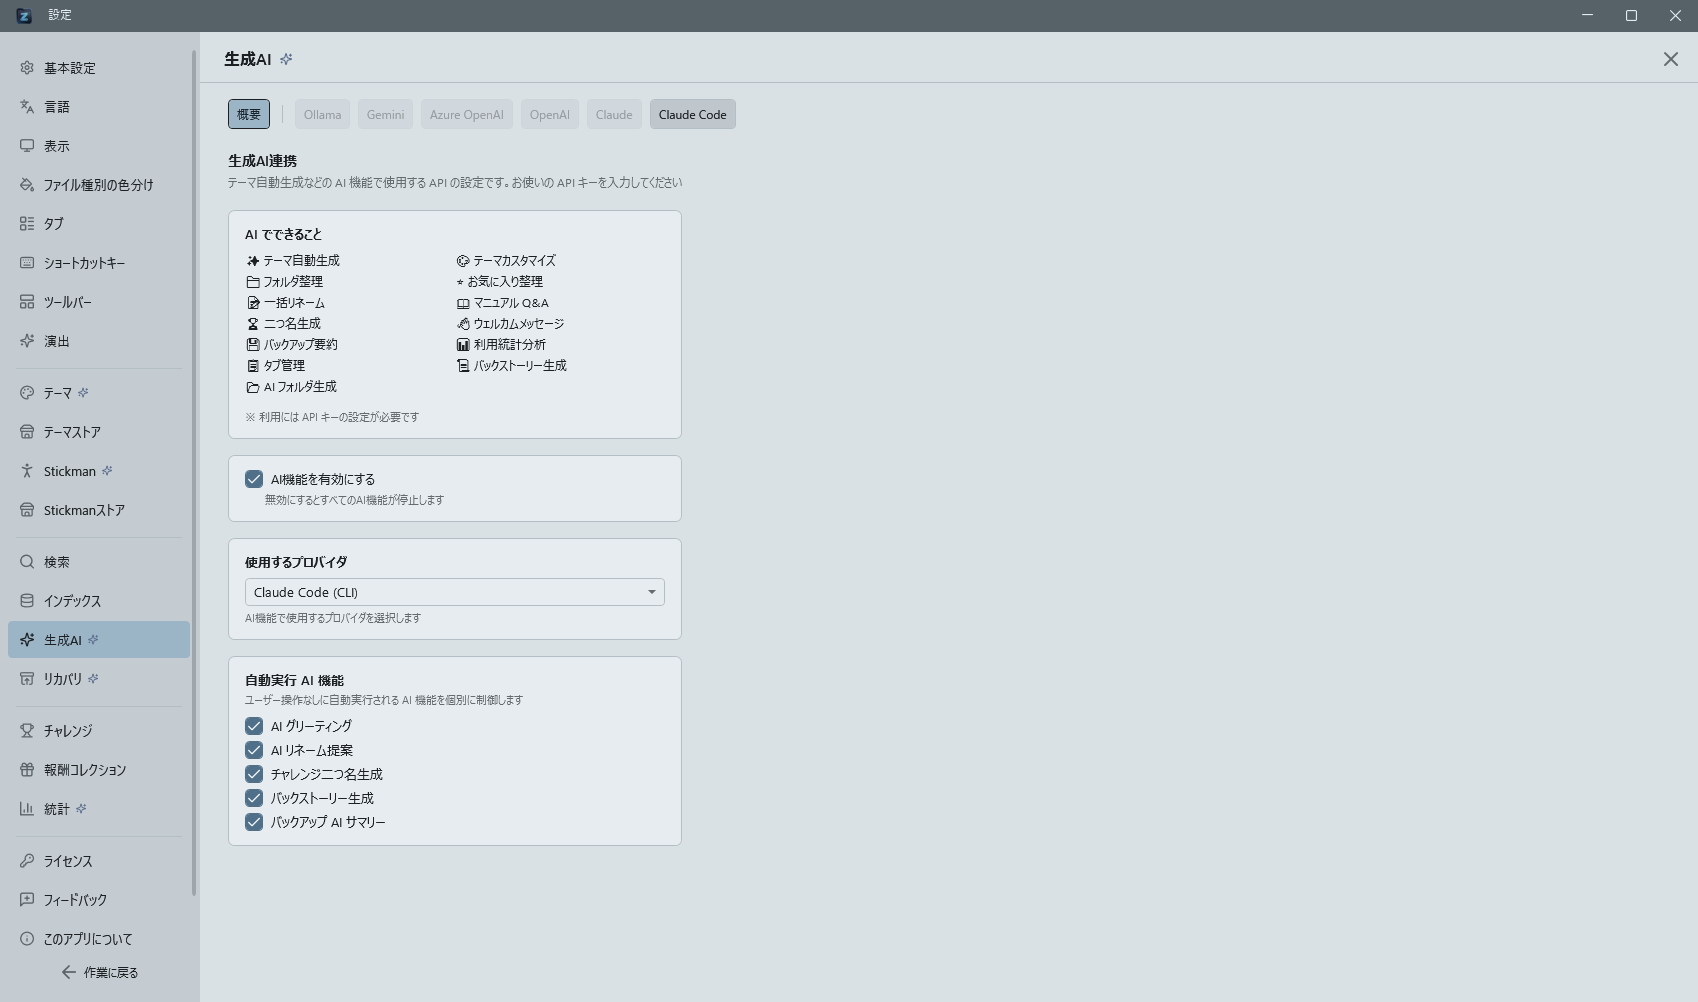
Configures the API for AI features.
- Provider: Claude / OpenAI / Azure OpenAI / Gemini / Ollama / Claude Code (CLI).
- API Key: Enter and save. Keys are encrypted with DPAPI and stored locally — never sent externally. "Clear" removes a saved key (Ollama and Claude Code (CLI) need no key).
- Endpoint (Azure OpenAI only): Specify the Azure resource URL.
- Test Connection: Verify the API key.
- Model: Dropdown per provider (empty uses default model). Newer-generation models (e.g. GPT-5 series) are also supported — the API format (Chat Completions / Responses) is detected automatically.
- Response wait time: How long to wait for a reply. Automatic (the default), 30 sec, 1 min, 2 min, 5 min or 10 min. Automatic follows whatever you are talking to (30 seconds for cloud providers, 2 minutes for reasoning models, 4 minutes for Claude Code, 5 minutes for locally run models such as Ollama); raise it only if replies get cut off.
Statistics
- Displays usage counts for 21 action types (search, file ops, tab ops, theme changes, etc.).
- Reset clears all statistics.
- Top 50 Folders ranking (most frequently viewed folders) is also displayed.
About
- Shows the current version and "what's new" for this version (auto-loaded from CHANGELOG).
- Enable auto-update (checkbox): Toggle periodic checks.
- Check for updates button: Manual check.
- After a new-version download completes, a "Restart and apply" button appears (see Auto-Update).